

Making a pastry can be intimidating. Most people don't work with dough often, but I cannot stress enough how easy it is once you make it once or twice. Dough is forgiving. It can be rerolled and patched if something goes wrong. With practice and patience, you can master this.
It's all about technique
I am firm believer in teaching the basic techniques of baking. Once you understand the process, you can improvise. After reading this blog you will understand the basics of making a pastry which can be used for quiches, tarts, or pies. The recipe in this blog is one that I use for quiches. It has a lot of butter and goes well with the egg filling. The recipe I use for pie is slightly different, but it uses the same technique. This recipe prebakes the pastry shell, which is also called blind baking. Pies do not need the pastry to be prebaked.
Necessary equipment
An important consideration is what equipment is necessary. A good rolling pin is important. Julia Child says, "A broom handle is better than a too-short rolling pin." I'm not sure I would go that far, but it does make the job easier. A wine bottle will do in a pinch or a clean broom handle. Rolling pins sell for about $10.

For this recipe a 10-inch tart pan with a removable bottom is required. Of course you could use a smaller or larger pan. You simply need to adjust the amount of filling, but again that doesn't change the technique for making the pastry. These pans sell for about $10.

The only other special equipment you will need is a weight to put inside the pastry when it is cooking to keep the pastry from rising. You can spend a lot of money and buy actual pie weights. Some even come with handles. Or you can just use raw lentils or beans. I use lentils and keep them in a resealable bag to be used over and over. You just need something to spread over the entire bottom surface of the pastry. You will use aluminum foil to prevent the weights from touching the pastry.

The ingredients
1 3/4 cups all-purpose flour
1 teaspoon salt
12 tablespoons butter (1 1/2 sticks)
1/3 - 1/2 cup cold water
The equipment
10-inch tart pan Medium bowl
Rolling pin Measuring spoons
Pie weights Spoon
Wax paper Knife
Measuring cups - dry and liquid
Measuring the ingredients
The flour must be measured correctly. Use the spoon and level technique. If you dip your measuring cup into the flour container you are likely to get too much flour because it will be compacted. Spoon the flour into your measuring cup and level it with a butter knife.

Making the pastry
Add the salt and flour to a medium bowl. Mix thoroughly. You want the salt to be evenly distributed.
Now it's time to cut in the butter. The purpose of this is to distribute the fat into the dry ingredients. You can do this by hand or with two knives. For both methods, cut the butter into small pieces and drop into the dry ingredients. If by hand rub the butter between your fingers until all of it becomes the size of peas. If using two butter knives have one in each hand. Start the knives on opposite sides of the bowl and drag them towards each other cutting the butter as you go. Continue until all the butter is pea-sized. This technique is demonstrated in this video for making Pete's biscuits.
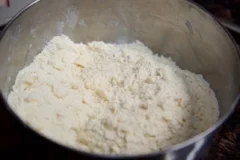
Add just enough water for the dough to come together. It's important that the water be cold so that the butter won't melt. Pour the dough onto a section of wax paper. Scrunch the dough together. The reason for the wax paper is to keep the heat from your hands from melting the butter. Try to handle the pastry as little as possible. You want the pastry to be completely mixed but don't over work it.


Once the dough is combined, flatten it out, wrap the wax paper around it, and cover it tightly with plastic wrap. Refrigerate for at least 1 hour and up to 2 days. The purpose of this step is to relax the gluten for a more tender pastry. If you used unbleached all-purpose flour, the pastry may turn a gray color, but that will not affect the taste.
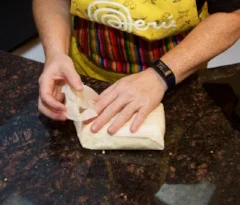
Pastry in wax paper on the way to the refrigerator
Pastry for pies
Most pies do not require prebaking before using. Consult the main recipe to see if prebaking is necessary.
Rolling out the dough for a quiche
Remove the dough from the refrigerator. It may seem hard, but do not let it warm up. If necessary hit the dough with your rolling pin to soften it. Lightly flour your workspace. Roll the dough out to about 1/4-inch thick and 2 inches larger than your pan. Roll from the center of the pastry to the edges. You want the dough to be the same thickness in the center and the sides. Turn your dough over occasionally to prevent it from sticking.
If you have a problem put the pastry back into the refrigerator. The dough will be slightly tougher because you are working it more, but this is a learning experience. Keep trying. It will work.

Pastry before it is baked
Carefully put the dough into the tart pan and press the dough into place. With your rolling pin roll over the top of the pan to remove the excess dough. The dough should be level with the top of your pan. Prick the bottom of the pastry with a fork. Cover and refrigerate 30 minutes. Again, we are trying to relax the gluten. Save any pastry scraps. Put them in a resealable bag and refrigerate. You made need to patch your pastry later. If you don't need the leftover pastry, roll it out, cut it into 4x2-inch pieces, sprinkle it with cinnamon sugar, and bake at 375º until golden brown, about 10 - 12 minutes.


Preheat oven to 450º. Remove the tart pan from the refrigerator. Line it with aluminum foil. Put the pie weights on the foil. Make sure the weights go to the edge.

Lentils used as pie weights
Prebaking the pastry
Bake the pastry for 7 minutes. Carefully remove the foil and weights and prick the pastry again. If the pastry has fallen down the sides carefully push it back into place. If necessary use some of the pastry scraps that you saved to patch any empty spots. Put the foil and weights back onto the pastry. Cook for 3 more minutes.
Carefully remove the foil and prick the pastry again. Cook for 3 more minutes without the weights until it is lightly browned. Remove from the oven. The pastry is now ready to be filled.